Autocomplete menu
The Algolia extension for Adobe Commerce and Magento Open Source uses autocomplete.js to create the menu that appears below the search box. The extension handles:
- Setting up the basic configuration options
- Setting up the sources
- Installing plugins
- Providing templates to render matching results from the sources
You can find all templates, JavaScript files and style sheets in the directory: vendor/algolia/algoliasearch-magento-2/view/frontend/web
This guide includes references to a custom extension template you can download and use as a starting point.
Core concepts
To customize Autocomplete you need to understand two things:
- Frontend events
- Templating
First, frontend events let you “hook” into the process by which the Magento extension builds your Autocomplete menu and inject your own JavaScript code to manipulate the shape of the data and where it comes from (your “sources”). You will need to register for these events within your custom Magento extension. These functions are also referred to as “hooks”.
Further, you can also use these hooks to add or update configuration options that affect the way Autocomplete functions.
For more information about these events, see Frontend custom events.
Secondly, templating is how you control the way your menu looks (the “presentation”). Autocomplete templates support JavaScript template literals.
At minimum, to enable hooks in your custom Magento extension, you will need to override algoliaHooks as described under “Where to place your hook”.
Basic configuration options
Here are some options you can change for your Autocomplete menu:
| Autocomplete option | Description |
|---|---|
placeholder |
Text shown in the search box before users type |
debug |
If true, the Autocomplete menu stays open even if you click outside it |
openOnFocus |
If true, the Autocomplete menu will display as soon as a user clicks on the search input field |
Use the afterAutocompleteOptions hook to change the Autocomplete options.
For example:
1
2
3
4
5
algolia.registerHook('afterAutocompleteOptions', function(options)  {
  // Add or modify options, then return them
  options.debug = true;
  return options;
});
Sources
The Autocomplete menu shows matching results from different sources. Sources tell Autocomplete where to retrieve the data for whatever your users are looking for.
To learn more about sources check out this article.
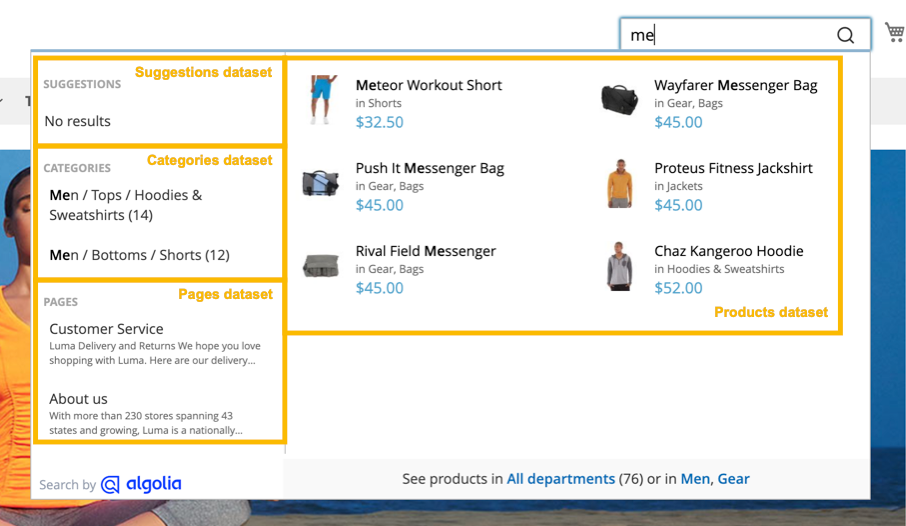
Specifying distinct sources also enables you to be able to support what is called federated search as demonstrated here:

Each source has options to define which index to query, and the templates for rendering the matching results.
Some sources are already provided for you in the Algolia Magento extension that you can use “out of the box”.
To change these sources, go to Stores > Configuration > Algolia Search > Autocomplete in the Magento administrator dashboard. You can select these sources:
| Autocomplete source | Description |
|---|---|
products |
Shows matching products from your catalog |
categories |
Shows matching product categories |
pages |
Shows matching pages |
suggestions |
Shows suggestions from popular search queries |
additional_sections |
Shows matching results from the Additional Sections you configured in the Magento administrator dashboard |
The afterAutocompleteSources event
If you want to change an existing source or add a new source to the Autocomplete menu,
you need to use the afterAutocompleteSources (formerly beforeAutocompleteSources) hook.
The callback function for afterAutocompleteSources must return the modified sources array, including the already configured sources.
For example:
1
2
3
4
algolia.registerHook('afterAutocompleteSources', function(sources, algoliaClient)  {
    // Add or modify sources, then return them
    return sources;
});
Parameters
The callback for afterAutocompleteSources accepts two parameters:
| Parameter | Type | Description |
|---|---|---|
sources |
Array of source objects | Defines where to retrieve the data for user queries |
searchClient |
Algolia search client | Initialized Algolia search client |
If you require access to other objects such as algoliaAnalytics you can use RequireJS to define them as a dependency for your algoliaHooks implementation.
Sources data structure
A minimal configuration for your source object might look like the following:
1
2
3
4
5
6
7
8
9
{
  sourceId: 'my-custom-source',
  indexName: 'my_custom_index',
  templates: {
    item({item, html}) {
      return html`<a href="${item.url}">${item.title}</a>`;
    }
  }
}
Each “source” in the sources array is a proxy JavaScript object with the following properties.
sourceID property
- Required
- Type: String
Unique identifier for your source. Use this to override an existing source.
indexName property
- Required
- Type: String
Name of the index used to populate the source. To reference a Magento store index use algoliaConfig.indexName as an index prefix.
templates property
- Required
- Type: Autocomplete template
A set of templates to customize how sections and their items are displayed. Includes callbacks for these templates:
itemnoResultsheaderfooter
At minimum an item template is required, otherwise there’s no way to know how to render your data.
getItemUrl property
- Type:
(params: { item: Item, state: AutocompleteState }) => string | undefined
Callback to return the URL to redirect users when they’re using keyboard navigation.
transformResponse property
- Type:
(response: { results: Array<SearchResponse | SearchForFacetValuesResponse>, hits: MaybeArray<Hit[]>, facetHits: MaybeArray<FacetHit[]> }) => MaybeArray<Hit[] | FacetHit[]>
The function to transform the Algolia response before passing it to the Autocomplete state.
For more information about this callback, take a look at the parameters for the getAlgoliaResults function.
options property
- Type: Search parameters
Override or supply additional search parameters to pass to the query for results from your source.
They aren’t the same as the options passed to afterAutocompleSources.
For example, to limit the number of results from your source you can use the hitsPerPage search parameter:
1
2
3
{
  "hitsPerPage": 3
}
Examples
In context of an entire hook, here is a possible implementation for adding a new source:
1
2
3
4
5
6
7
8
9
10
11
12
13
14
15
16
17
18
19
20
21
22
23
24
25
26
algolia.registerHook(
    "afterAutocompleteSources",
    function (sources, searchClient) {
        // Add new source
        sources.push({
            sourceId : "my-custom-source",
            // Use algoliaConfig.indexName to utilize index prefix by store scope
            indexName: algoliaConfig.indexName + '_my_custom_index',
            options  : {hitsPerPage: 3},
            templates: {
                noResults() {
                    return "No results found";
                },
                header() {
                    return 'My Custom Source';
                },
                item({item, html}) {
                    return html`<a class="aa-ItemLink" href="${item.url}">${item.title}</a>`;
                }
            }
        });

        // Make sure to return the sources array from your hook :)
        return sources;
    }
);
To modify an existing hook, here is a possible approach:
1
2
3
4
5
6
7
8
9
10
11
algolia.registerHook(
  "afterAutocompleteSources",
  function (sources, searchClient) {
    // Modify the "pages" source
    const pages = sources.find(source => source.sourceId === 'pages');
    pages.transformResponse = ({ hits }) => {
      // do something with the hits returned by this source
      return hits;
    };
    return sources;
}
Plugins
Autocomplete can be extended with plugins. The Magento implementation ships with an implementation of the query suggestions plugin.
However, you may wish to modify the implementation for query suggestions or add your own plugins. To do this you will use the afterAutocompletePlugins event.
The following example shows how you might add recent searches to your Autocomplete menu:
1
2
3
4
5
6
7
8
9
10
11
12
13
14
15
16
17
18
19
20
21
algolia.registerHook('afterAutocompletePlugins', (plugins, searchClient) => {
  const recentSearchesPlugin = algoliaRecentSearches.createLocalStorageRecentSearchesPlugin({
      key: 'navbar',
      transformSource({source}) {
          return {
              ...source,
              templates: {
                  ...source.templates,
                  header: () => 'Recent searches',
                  item: ({item, html}) => {
                      return html`<a class="aa-ItemLink" href="${algoliaConfig.resultPageUrl}?q=${encodeURIComponent(item.label)}">${item.label}</a>`;
                  }
              }
          }
      }
  });

  plugins.push(recentSearchesPlugin);

  return plugins;
}
Presentation
Keep in mind that the sources and plugins that you add to your Autocomplete menu will affect the resulting layout of the search results returned by a user’s query. Be sure to add CSS and corresponding templates as needed to produce the final desired result.
Click events
When a user selects a search result, the Autocomplete menu sends a click event to Algolia:
- If you enabled Click and conversion analytics
- If you configured Personalization
If you want to track custom events, see Custom frontend events.
Keyboard navigation
This feature is available in the Algolia extension for Magento Open Source and Adobe Commerce version 3.9.2 or later.
To change the setting for keyboard navigation, go to Stores > Configuration > Algolia Search > Enable keyboard navigation in the Magento dashboard. By default, keyboard navigation is turned on.

Keyboard navigation only works with the up/down keys, the left/right keys have no effect. Autocomplete implements the WAI-ARIA 1.2 combobox specification, which only specifies navigation behavior for the up and down keys.
Autocomplete menu templates
When you update templates, it’s best to keep the changes in your theme directory. Don’t edit the theme files in the extension directory if possible. Follow Adobe Commerce theme development best practices.
To change the appearance of the Autocomplete menu, you can override these templates in your theme:
| Template file | Description |
|---|---|
autocomplete.phtml |
Template for the Autocomplete menu |
products.js |
Template for products source |
categories.js |
Template for categories source |
pages.js |
Template for pages source |
suggestions.js |
Template for popular queries source |
additional-section.js |
Template for any extra content configured in the Magento administrator dashboard |
You can find all JavaScript template files in the web/internals/template/autocomplete directory.
JavaScript mixins with RequireJS
Mixins let you change the rendering of specific parts of a template without having to override the entire file.
To do this, create a requirejs-config.js file in your theme or custom module:
1
2
3
4
5
6
7
8
9
var config = {
    config: {
      mixins: {
        'Algolia_AlgoliaSearch/internals/template/autocomplete/products': {
          'Algolia_CustomAlgolia/template/autocomplete/products-mixin': true
        }
      }
    }
};
A sample products-mixin.js might look as follows:
1
2
3
4
5
6
7
8
9
10
11
12
13
14
15
16
17
18
19
20
21
22
23
24
25
26
27
28
29
30
31
32
33
34
35
36
37
38
// SAMPLE PRODUCT MIXIN
define(function () {
  "use strict";

  const mixin = {
    getItemHtml: function ({ item, components, html }) {
      return html`<a
        class="algoliasearch-autocomplete-hit"
        href="${item.__autocomplete_queryID != null
          ? item.urlForInsights
          : item.url}"
      >
        <div class="thumb">
          <img src="${item.thumbnail_url || ""}" alt="${item.name || ""}" />
        </div>
        <div class="info">
          ${components.Highlight({ hit: item, attribute: "name" })}

          <!-- BEGIN SAMPLE CUSTOMIZATION -->
          <!-- (Adding SKU to Autocomplete HTML output) -->
          <div class="sku">${item.sku}</div>
          <!-- END SAMPLE CUSTOMIZATION -->

          <div class="algoliasearch-autocomplete-category">
            ${this.getColorHtml(item, components, html)}
            ${this.getCategoriesHtml(item, components, html)}
          </div>

          ${this.getPricingHtml(item, html)}
        </div>
      </a>`;
    },
  };

  return function (target) {
    return { ...target, ...mixin };
  };
});
In the preceding example, a mixin was written only for the getItemHtml method in the Autocomplete product hit template to add an item’s sku field to the generated output. All other behavior remains the same.
If you only want to modify specific renderings, you can implement a mixin for methods like getColorHtml or getCategoriesHtml without editing the getItemHtml method.
Mixins let you change the rendering of specific pieces of content within a template without having to override the entire file.
Using wrappers
Another approach to building Autocomplete template mixins is with Magento’s supplied mage/utils/wrapper JavaScript module.
The following example overrides the getHeaderHtml method of the Autocomplete category hit template:
1
2
3
4
5
6
7
8
9
10
11
12
13
14
15
// SAMPLE CATEGORIES MIXIN
define(["mage/utils/wrapper"], function (wrapper) {
    "use strict";

    return function (template) {
        template.getHeaderHtml = wrapper.wrapSuper(
            template.getHeaderHtml,
            function (args) {
                const orig = this._super(args);
                return `${orig}: This category template was customized!`;
            }
        );
        return template;
    };
});
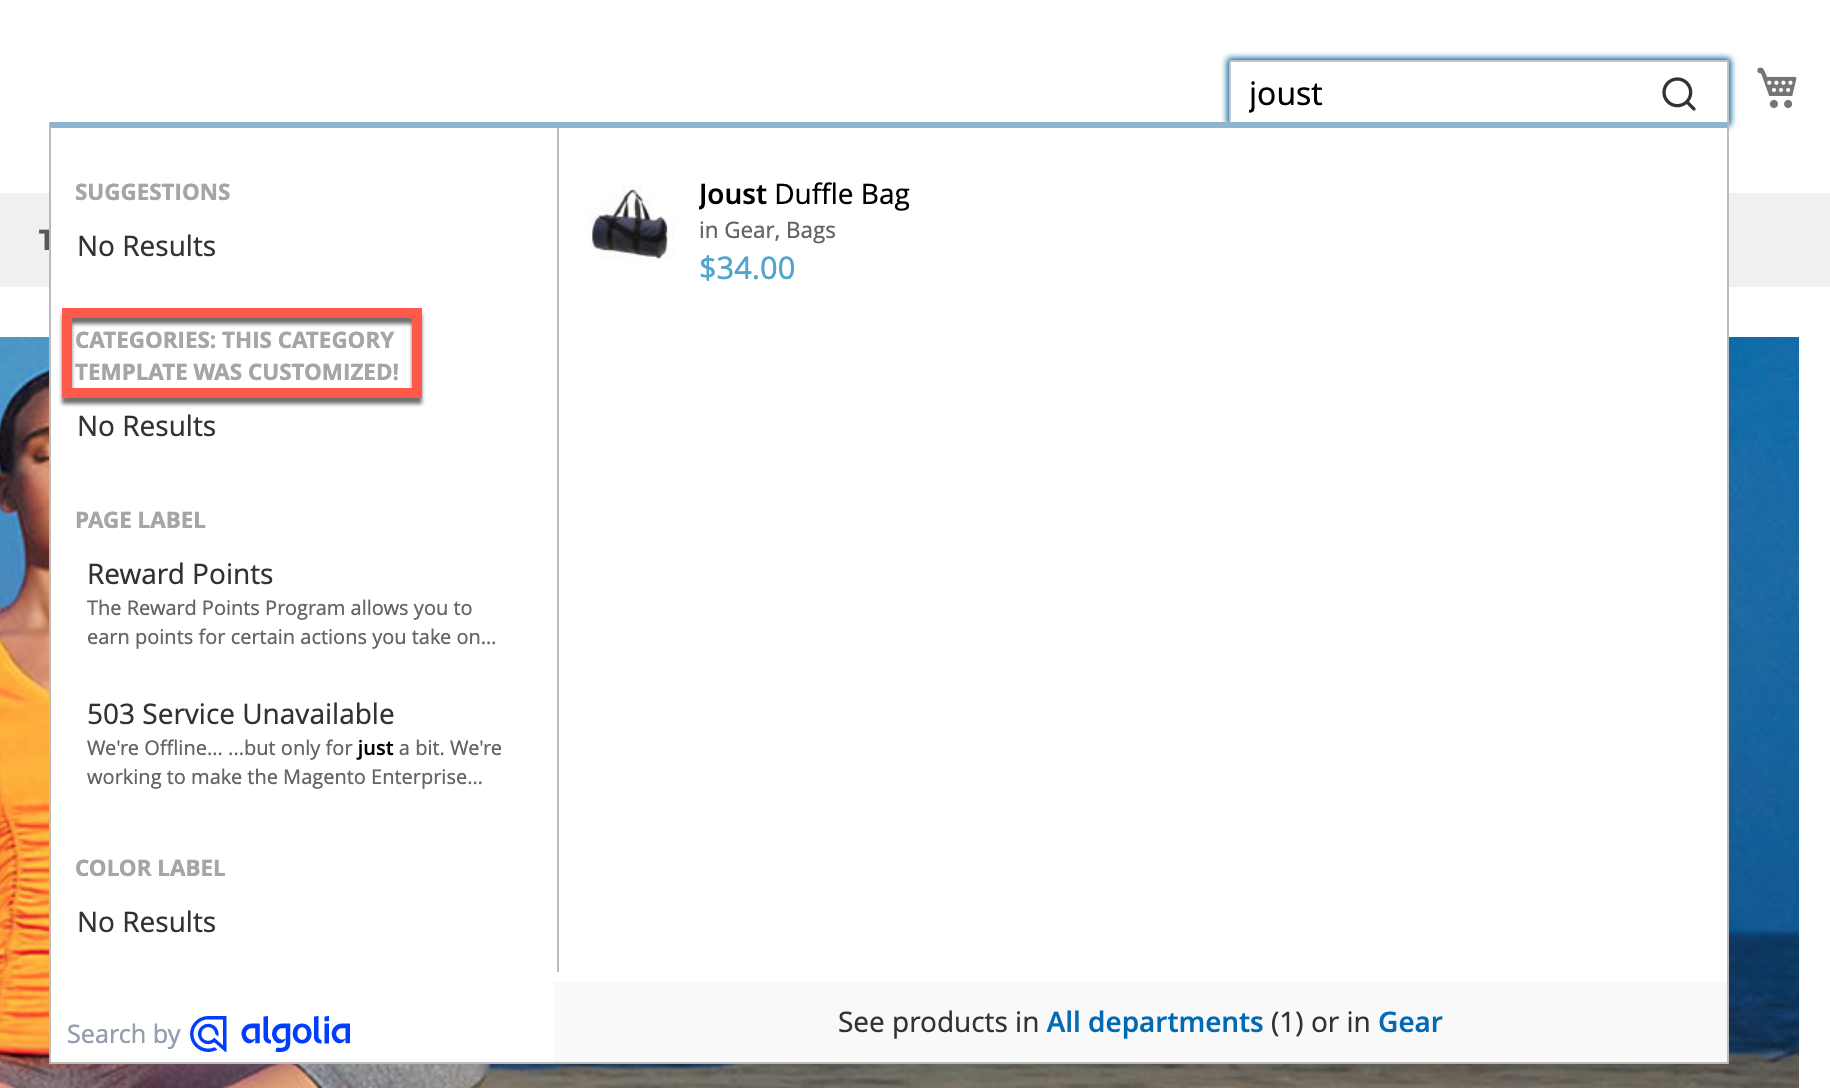
One benefit to this approach is that you can invoke the original template function and include its output in the override by calling the wrapper’s _super method.
The result of the previous code is demonstrated below:

To see even more ways to use JavaScript mixins with Magento, reference the Adobe Commerce documentation.
Custom Algolia module
To help you build your mixins faster, try the Algolia_CustomAlgolia extension which will install a set of starter templates that you can customize further for your app.
For more information see Create a custom extension.
Autocomplete menu styles
If you want to change the style of the Autocomplete menu, it’s best to enable the Autocomplete debug mode. This keeps the Autocomplete menu open and lets you inspect its DOM elements.
You can enable the debug mode in Stores > Configuration > Algolia Search > Autocomplete > Enable autocomplete menu’s debug mode.

Debouncing
Debouncing is a technique to prevent a function from being called too frequently by delaying its execution for a specified period of time.
Autocomplete returns new results from the Algolia API for every keystroke. While that delivers instant user feedback, it might sometimes be better to delay triggering the search request. This leads to fewer search requests and leads to fewer UI changes, which can aid users who prefer reduced motion in their UI.
To adjust the debounce settings, open your store Admin and go to Stores > Configuration > Algolia Search > Autocomplete.
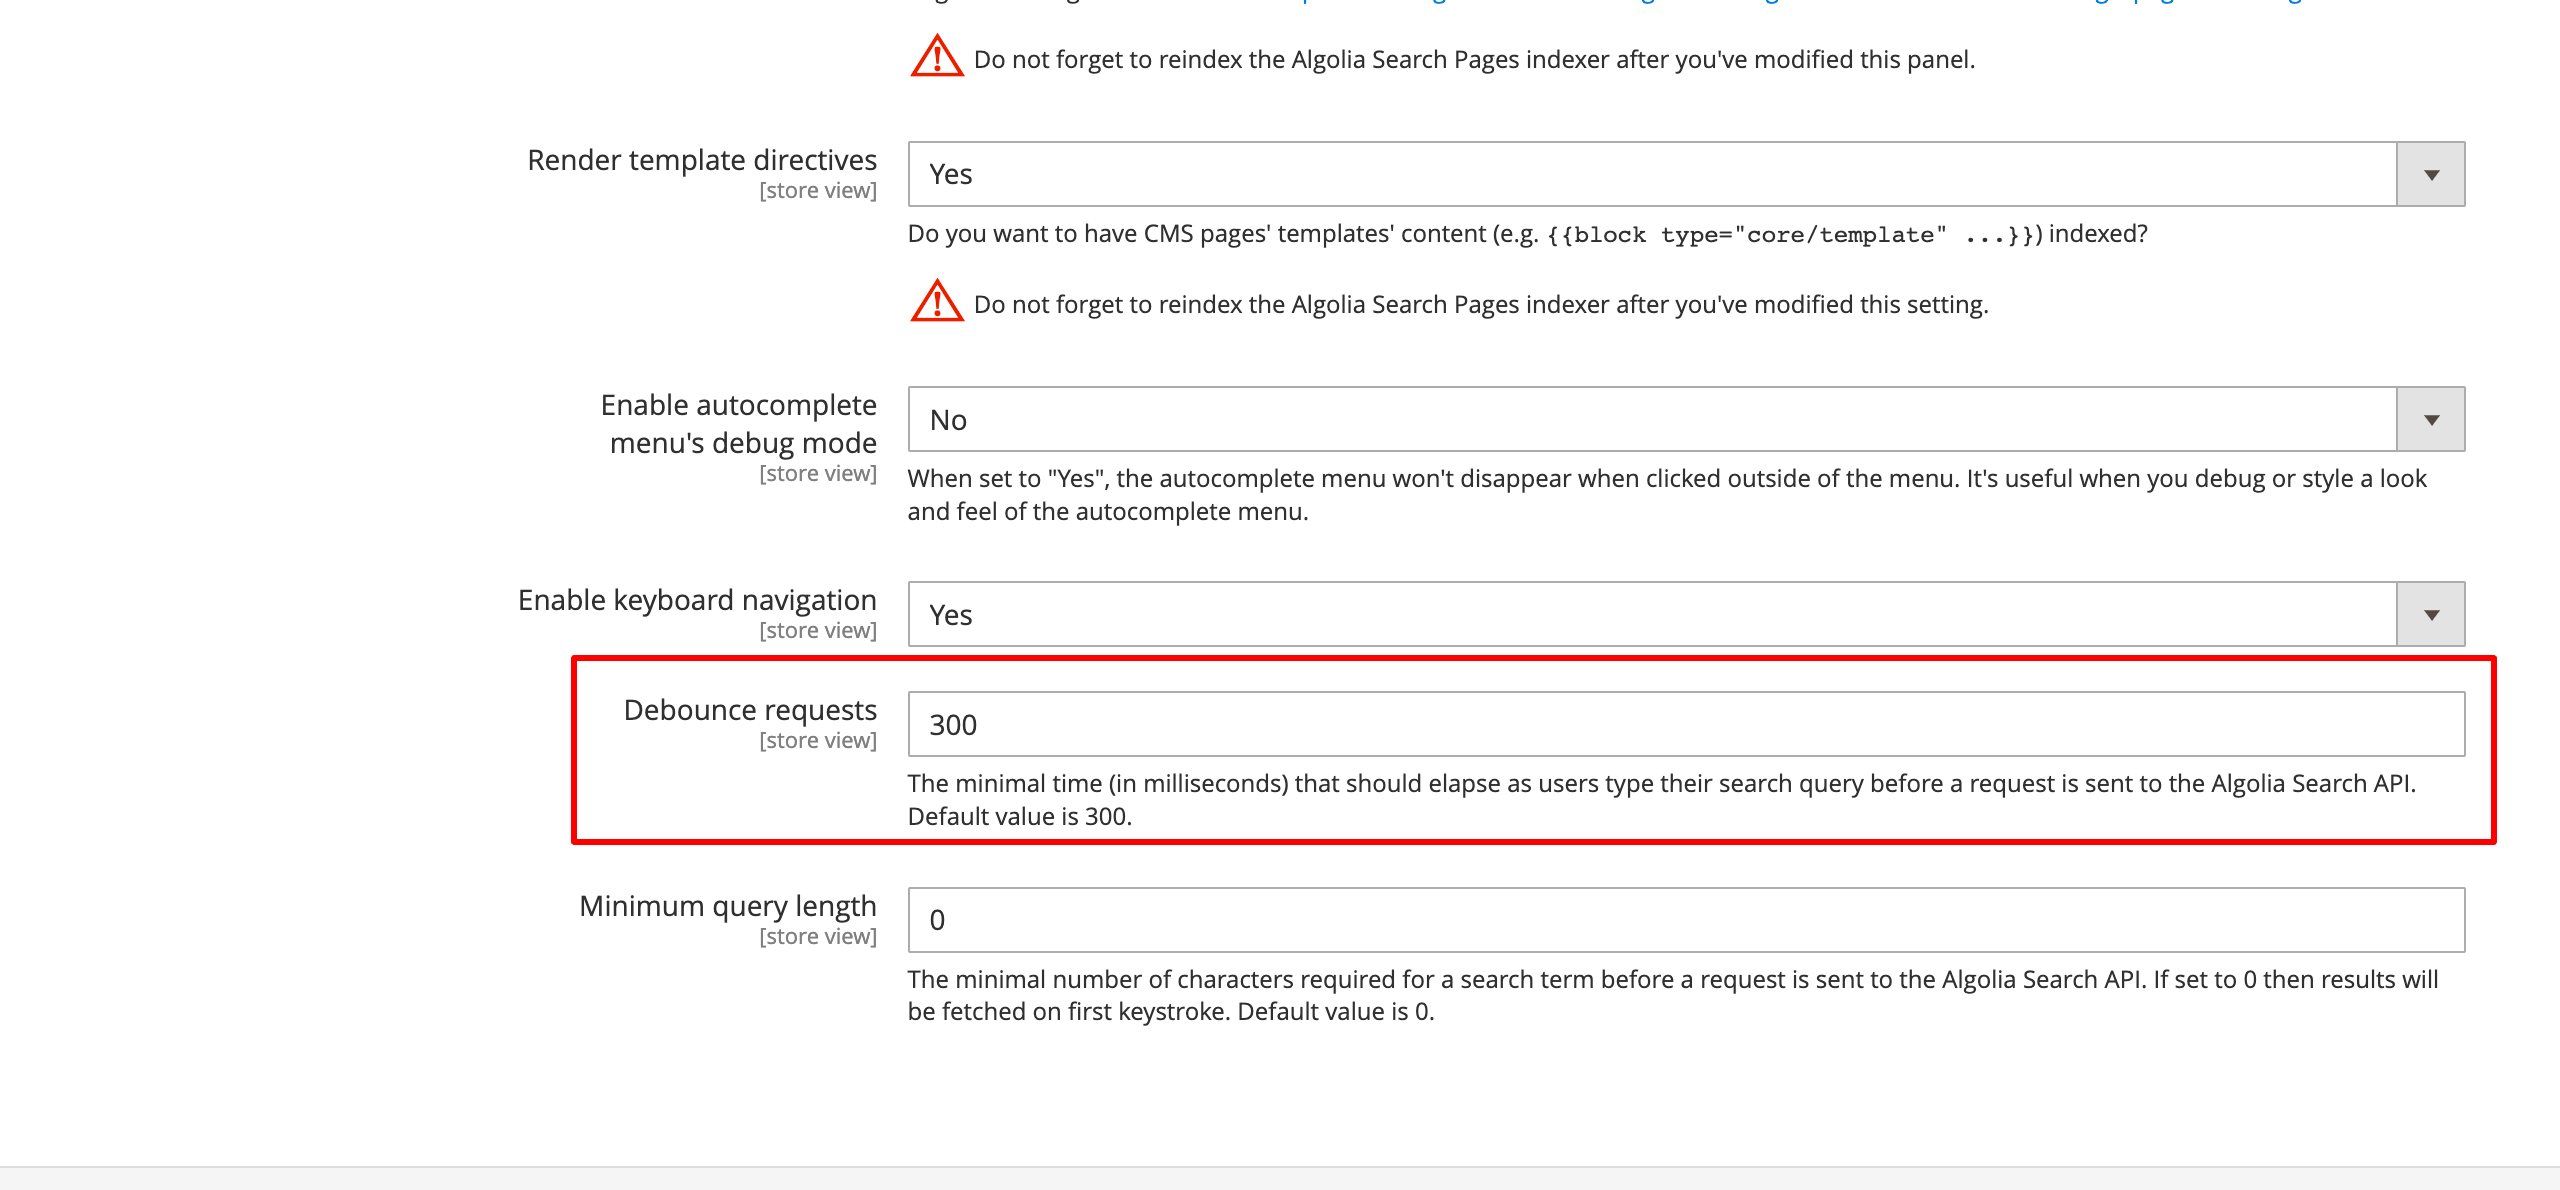
Debounce requests
The minimal time (in milliseconds) that should elapse as users type their search query before sending a request to the Algolia Search API.
By default, the debounce time is 300 milliseconds.

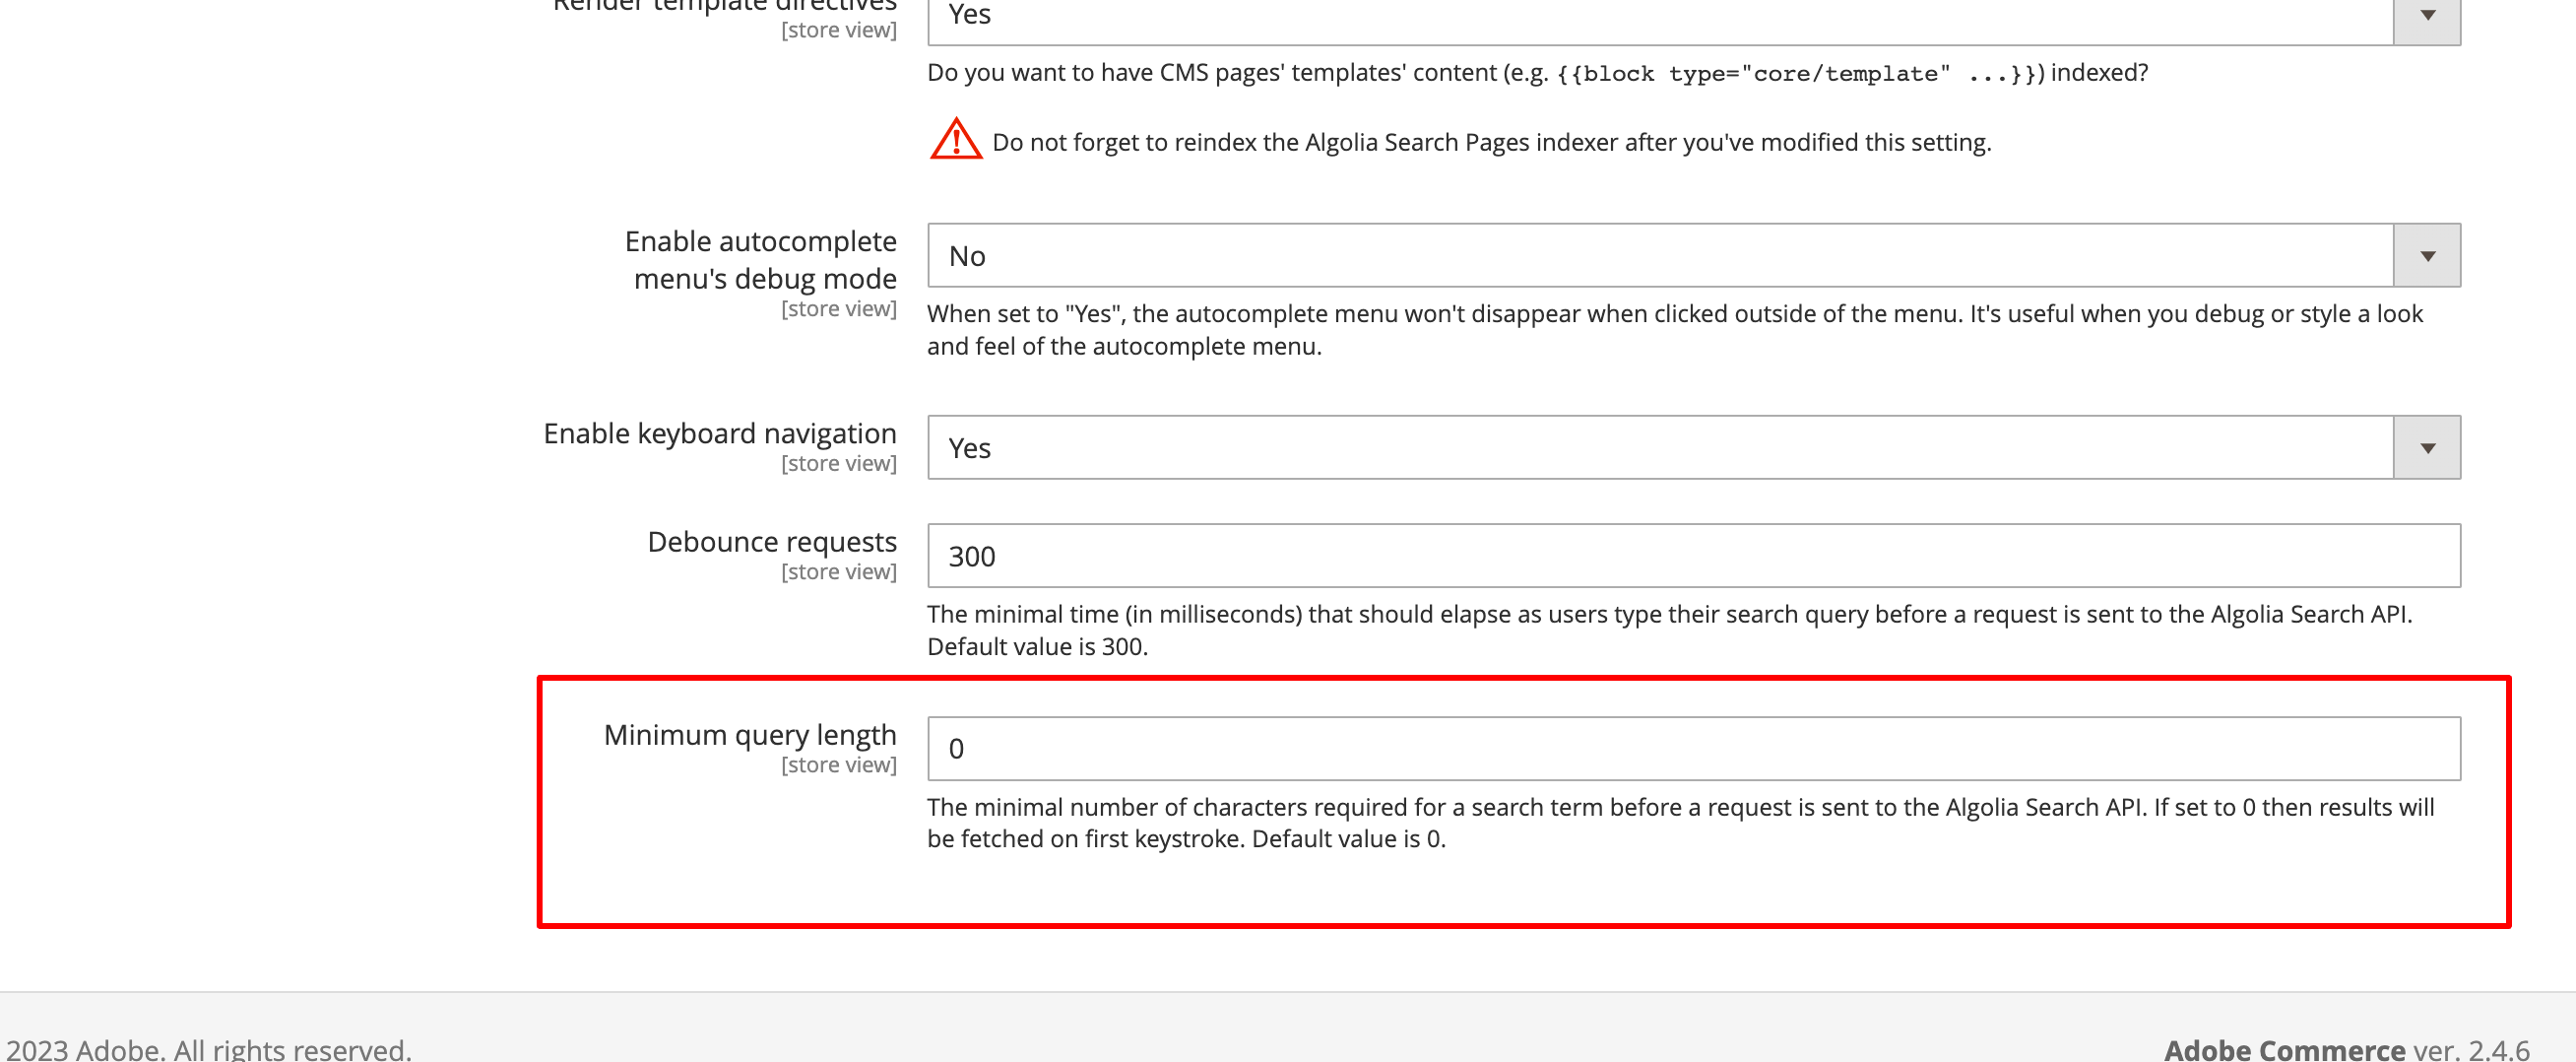
Minimum query length
The minimal number of characters users have to enter before sending a request to the Algolia Search API. If set to O, results will be fetched from the first keystroke.

Custom theme
By default, the extension overrides the topSearch block of the template.
If you’re using a custom theme without the topSearch block,
you need to update the DOM selector for the search input.
Go to Stores > Algolia Search > Autocomplete Menu in the Magento Admin panel, and change the Search Input Container Selector:

If the container selector is defined, the extension overrides the topSearch block and loads the necessary scripts.
To give the Autocomplete search-as-you-type menu the look and feel you want, you need to update the styles.
