Frontend custom events
Customizing
The extension uses libraries to help assist with the frontend implementation for autocomplete, InstantSearch, and insight features. When you approach customization, you have to understand that you are customizing the implementation itself and not the components it’s based on.
These libraries are here to help add to your customization. As the extension has already initialized these components, you should hook into the area between the extension and the libraries.
The library bundle
Depending on your extension version, you can have different versions of the autocomplete.js v0.x or InstantSearch libraries installed. Refer to the extension’s repository for more information.
Knowing the version of the extension helps you understand what’s available in these libraries for you to leverage. It also helps you find which documentation to reference when you start working on your customization.
The algoliaBundle.js file holds the libraries for autocomplete and InstantSearch as well as their dependencies. They’re also accessible in the algoliaBundle global and added to most of the event hooks for access. If necessary it is also possible to load the algoliaBundle dependency via RequireJS.
The search-insights.js library is a standalone for the insights features like Click and Conversion Analytics and Personalization.
Accessing frontend configurations
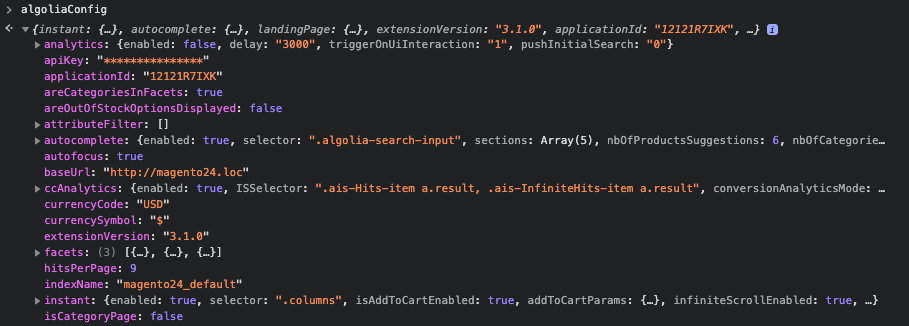
The extension handles the implementation of the frontend features based on your configuration in Stores > Configuration > Algolia Search. The extension stores these settings in the global JavaScript object algoliaConfig. The data for this object returns from the block method Algolia\AlgoliaSearch\Block\Configuration::getConfiguration() and set in the configuration.phtml template file. The autocomplete and InstantSearch implementations refer to this global variable to build their UI.
To inspect the algoliaConfig object, type algoliaConfig in your browser’s console when on your Magento store.

In this object, you can see references for search credentials, index name prefix, display settings for autocomplete and InstantSearch, facets configuration, and other options related to the search UI.
This is a helpful reference to understand what’s built on the frontend and for your customizations.
Dependency loading with RequireJS
Before version 3.10.3, the extension loaded its JavaScript resources with script tags. This had several disadvantages, such as:
- Pollution of the global namespace
- Inability to defer loading of JavaScript asynchronously to improve perceived page load times
- Inability to ensure that all dependencies are always available to the calling resource
As a result, scenarios could arise where the needed libraries did not load in the intended order.
From version 3.10.3, global Algolia objects are still supported for backward compatibility, but all Algolia JavaScript libraries are now loaded as RequireJS dependencies (following Magento recommendations).
This update means that when referencing Algolia objects in the global window namespace in your custom implementation, you should first use require or define to ensure they’re loaded and ready for your customizations.
For instance, several global objects are loaded by algoliaCommon, which contains the object algolia. If you want to reference this object to register a new frontend hook, you must pass algoliaCommon as a dependency.
For example, the following naked call to the algolia object is no longer supported:
1
2
3
4
5
6
7
algolia.registerHook(
    "afterAutocompleteSources",
    (sources, searchClient) => {
        console.log('Customizing the autocomplete sources...');
        return sources;
    }
);
To ensure that this object is available to your script, surround your block as follows:
1
2
3
4
5
6
7
8
9
require(['algoliaCommon'], () => {
    algolia.registerHook(
        "afterAutocompleteSources",
        (sources, searchClient) => {
            console.log('Customizing the autocomplete sources...');
            return sources;
        }
    );
});
Even better, declare your custom file as a RequireJS AMD module using define and a declaration in requirejs-config.js. Refer to the “Where to place your hook” guidelines to implement an algoliaHooks override to guarantee that Algolia’s libraries (like Autocomplete and InstantSearch) load in the proper sequence after you have registered your custom hooks.
For an example of how to implement this kind of customization, see the CustomAlgolia boilerplate module on GitHub.
How to use event hooks
The extension provides hooks to help you add or change parameters for implementation. The algolia window variable is an object that handles the setting and firing of these events. (To ensure that the algolia object is available to your custom implementation, declare algoliaCommon as a RequireJS dependency.)
Try typing algolia in your browser’s console when on your Magento store. Your console outputs an object with methods that help trigger events throughout the frontend implementation for autocomplete, InstantSearch, and insights.
There are different events available to you depending on your extension version. You can see all available events by entering algolia.allowedHooks in your browser’s console.

It’s highly recommended that you find where these events dispatch in the extension to help understand what parameters are available to use and what to return.
When it comes to the extension, the primary use of the algolia object is to add your callback function to the available events. To add your hook, use the algolia.registerHook method, which accepts the parameters of eventName and the callback function.
1
2
3
4
algolia.registerHook('beforeWidgetInitialization', function(allWidgetConfiguration, algoliaBundle) {
    // add your code here
    return allWidgetConfiguration;
});
The example adds the customisation at the beforeWidgetInitialization event. The event fires from the instantsearch.js file as:
1
allWidgetConfiguration = algolia.triggerHooks('beforeWidgetInitialization', allWidgetConfiguration, algoliaBundle);
You can see that the event has access to the variable allWidgetConfiguration. This variable holds all the InstantSearch widgets configuration already created for you based on your extension settings. Using this event, you can return a modified allWidgetConfiguration for the InstantSearch implementation.
Where to place your hook
You must add your hook before the event fires by placing your JavaScript customization in your custom module or theme. Don’t edit the extension or override the extension files unless necessary.
The extension adds JavaScript files using RequireJS. Utilizing the dependency algoliaHooks will ensure that your hooks fire at the appropriate time before the InstantSearch or Autocomplete UI is built.
It is recommended to override this file using requirejs-config.js as demonstrated below:
1
2
3
4
5
6
7
8

const config = {
    map: {
        "*": {
            algoliaHooks: 'Algolia_CustomAlgolia/hooks'
        }
    }
};
Read the Magento JavaScript Developer Guide to learn more about how to call and initialize JavaScript in Magento 2.
For either option, the hook fires when the event triggers. It’s not necessary to wait for the DOM to be ready.
Debugging your hook
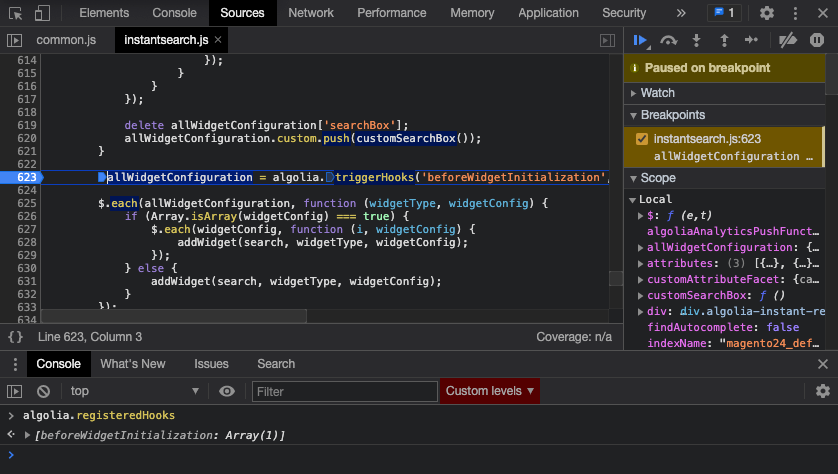
If your hook doesn’t fire, use your browser’s developer tools to add a break-point on the event. You can then inspect algolia.registeredHooks to see all the registered hooks added at that point of the script.

If your hook wasn’t added by this point, run your hook earlier by moving the customization higher in the loading order, but not before common.js. The extension requires that common.js runs before to access the algolia global.
Please remember that hooks don’t need to wait for DOM ready. In fact, running it after DOM ready registers the hooks after the event fires which isn’t ideal.
Autocomplete menu events
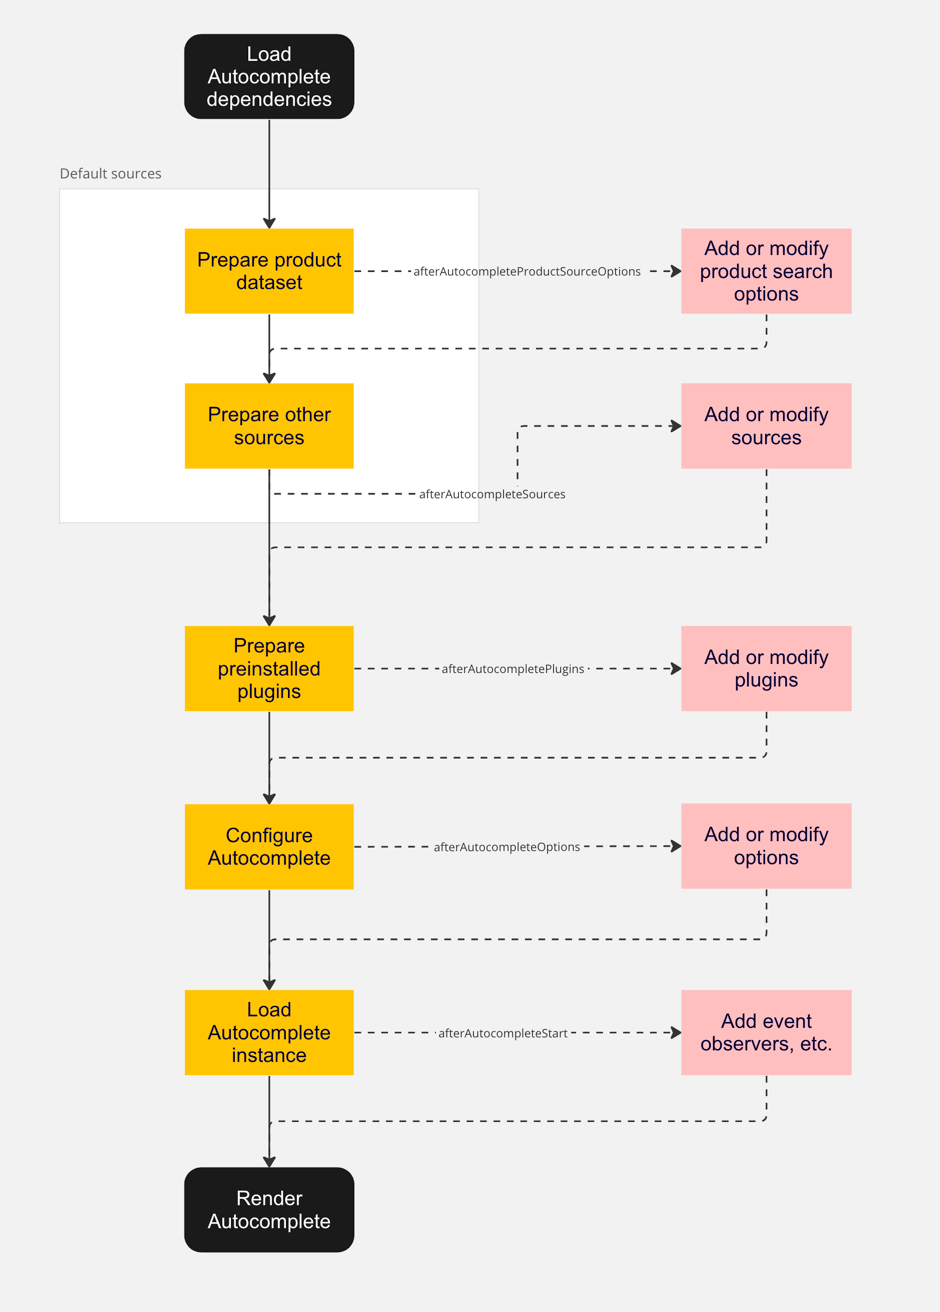
The following diagram demonstrates the process by which events are triggered when Autocomplete loads:

You can adjust all the logic of the autocomplete.js integration by registering a custom method in your JavaScript file. You can register hooks with the algolia object.
To learn how to add a custom JavaScript, see Create a custom extension.
Possible hooks:
afterAutocompleteSources(sources, algoliaClient)- Can be used to modify default data sources
- The hook must return
sourcesvariable
afterAutocompletePlugins(plugins, algoliaClient)- Can be used to modify default plugins
- The hook must return
pluginsvariable
afterAutocompleteOptions(options)- Can be used to modify default options of autocomplete menu
- The hook must return
optionsvariable
afterAutocompleteProductSourceOptions(options)- Can be used to modify default options of the products source of autocomplete menu
- Are also referred to as search parameters
- The hook must return
optionsvariable
These hooks are triggered right before the autocomplete feature initializes.
Examples of the hooks:
1
2
3
4
5
6
7
8
9
10
11
12
13
14
algolia.registerHook('afterAutocompleteSources', function(sources, algoliaClient)  {
  // Add or modify sources, then return them
  return sources;
});

algolia.registerHook('afterAutocompleteOptions', function(options) {
  // Modify options, then return them
  return options;
});

algolia.registerHook('afterAutocompleteProductSourceOptions', function(options) {
  // Modify options, then return them
  return options;
})
afterAutocompleteStart(algoliaAutocompleteInstance)- can be used to observe events on the autocomplete element
- the hook must return
algoliaAutocompleteInstancevariable
Example of the hook:
1
2
3
4
5
// Bind new event on the autocomplete element
algolia.registerHook('afterAutocompleteStart', function(algoliaAutocompleteInstance) {
  // Modify default autocomplete instance, then return it
  return algoliaAutocompleteInstance;
});
Instant search page events
You can adjust all the logic of the InstantSearch.js integration by registering a couple of custom hooks:
beforeInstantsearchInit(instantsearchOptions, algoliaBundle)- can be used to modify default
instantsearchoptions
- can be used to modify default
beforeWidgetInitialization(allWidgetConfiguration, algoliaBundle)- can be used to add/remove/modify any widgets
beforeInstantsearchStart(search, algoliaBundle)- can be used to modify the
instantsearchinstance before call ofstart()method
- can be used to modify the
afterInstantsearchStart(search, algoliaBundle)- can be used to modify the
instantsearchinstance after call ofstart()method
- can be used to modify the
By registering these hooks in your JavaScript file, you can directly modify their parameters which must be returned back from the method.
Example of the beforeInstantsearchInit(instantsearchOptions, algoliaBundle) hook:
1
2
3
4
5
6
7
8
9
10
11
12
13
14
15
16
17
18
19
20
// Modify default `instantsearchOptions`
algolia.registerHook('beforeInstantsearchInit', function(instantsearchOptions, algoliaBundle) {

  // Adding a custom Query Rule context
  var newQueryRuleContext = 'new-custom-query-rule-context';
  instantsearchOptions.searchParameters.ruleContexts.push(newQueryRuleContext);
  // see other possible searchParameters: https://www.algolia.com/doc/api-reference/api-parameters/

  // Example of an after search callback
  var callbackSearchFunction = instantsearchOptions.searchFunction;
  instantsearchOptions.searchFunction = function(helper) {

    // Add your `searchFunction` methods here

    // Run the previous `searchFunction`
    callbackSearchFunction(helper);
  }

  return instantsearchOptions;
});
Example on how to add a new toggleRefinement widget to instant search page:
1
2
3
4
5
6
7
8
9
10
11
12
13
14
15
16
17
18
19
20
21
22
23
algolia.registerHook('beforeWidgetInitialization', function(allWidgetConfiguration) {
  const wrapper = document.getElementById('instant-search-facets-container');

  const widgetConfig = {
    container: wrapper.appendChild(createISWidgetContainer('in_stock')),
    attribute: 'in_stock',
    label: 'In Stock',
    values: {
      on: 1
    },
    templates: {
      header: '<div class="name">Is in stock</div>'
    }
  };

  if (typeof allWidgetConfiguration['toggleRefinement'] === 'undefined') {
    allWidgetConfiguration['toggleRefinement'] = [widgetConfig];
  } else {
    allWidgetConfiguration['toggleRefinement'].push(widgetConfig);
  }

  return allWidgetConfiguration;
});
All default widgets can be found in allWidgetConfiguration object and can be removed or modified in this method.
However, some widgets, like hits, can not be added multiple times. In that case, you should add the widget manually in beforeInstantsearchStart:
1
2
3
4
5
6
7
8
algolia.registerHook('beforeInstantsearchStart', function (search) {
  search.addWidget(
    algoliaBundle.instantsearch.widgets.hits({
      container: '#custom-second-hits',
    })
  );
  return search;
});
Insights events
You can add new events for Click and Conversion Analytics and Personalization by registering this custom hook:
afterInsightsBindEvents(algoliaInsights)- can be used to add new events
algoliaInsightsgives you access to methods for tracking:trackClick(eventData)trackView(eventData)trackConversion(eventData)
- to format
eventDatafor insights you can use:buildEventData(eventName, objectID, indexName, position = null, queryID = null)- Click and Conversion Analytics requires the optional parameters for
positionandqueryID
Example of a custom click event for personalization:
1
2
3
4
5
6
7
8
9
10
11
12
13
14
15
16
17
18
19
20
21
22
23
algolia.registerHook('afterInsightsBindEvents', function(algoliaInsights) {

    var selectors = document.querySelectorAll('.class-selector');
    selectors.forEach(function (e) {
        e.addEventListener('click', function (event) {

            // selector in this example has an data-objectid attribute
            // with the objectID as the value
            var objectId = this.dataset.objectid;

            // use the buildEventData function to format event data
            var eventData = algoliaInsights.buildEventData(
                'Clicked Event Name', // eventName
                objectId, // objectID
                algoliaConfig.indexName + '_products' // indexName
            );

            algoliaInsights.trackClick(eventData);

        });
    });

});
Example usages
You can use this section as inspiration for your customization.
Add category sorting in the autocomplete menu
This examples creates a new section that displays categories with the product results. To learn more about templating, see Create a custom extension.
To get the categories that are returned by a product search, you need to create a new section that queries the products index.
When you define the source of this section, pass the facets parameter that returns the categories attribute which the extension indexes as: categories.level0 or categories.level2.
The search returns product results as hits, so you need to render the facets instead of products. You can render the facets in the template suggestions function. Make sure that your template variables match those returned by the facets to render them in autocomplete.
1
2
3
4
5
6
7
8
9
10
11
12
13
14
15
16
17
18
19
20
21
22
23
24
25
26
27
28
29
30
31
algolia.registerHook('beforeAutocompleteSources', function(sources, algoliaClient, algoliaBundle)  {
    let source = {
        hitsPerPage: 2,
        label: "Category w/ Products ",
        name: "products",
        options: {
            analyticsTags: "autocomplete",
            clickAnalytics: true,
            distinct: true,
            facets: ['categories.level0, categories.level2'],
            maxValuesPerFacet: 3
        },
        paramName:algoliaClient.initIndex(algoliaConfig.indexName + "_" + 'products'),
        templates: {
            noResults({html}) {
                return 'No Results';
            },
            header({html, items}) {
                return 'Category w/ Products';
            },
            item({ item, components, html }) {
                // Their Html will go here
            },
            footer({html, items}) {
                return "";
            }
        }
    };
    sources.push(source);
    return sources;
});
Add filters to your autocomplete search
To add a new filter, modify the section’s search parameters to include the new filter condition. To do this, you need to recreate the source with the updated options.
The example below adds a new numericFilters to the search parameters, in_stock=1.
To recreate the source value, you need to recreate the options passed into the product source as defined in common.js.
The numericFilters returns an array of conditions that includes the new condition.
1
2
3
4
5
6
7
algolia.registerHook('beforeAutocompleteProductSourceOptions', function(options)  {
    options.analyticsTags = 'autocomplete',
    options.clickAnalytics = true,
    options.facets = ['categories.level0'],
    options.numericFilters = ['visibility_search=1', 'in_stock=1'];
    return options;
});
Add custom rules context to InstantSearch
If you have to add new contexts for some of your custom rules, use the specified frontend hook for your InstantSearch version. You should add your new context to the preconfigured contexts:
1
2
3
4
5
6
7
algolia.registerHook('beforeInstantsearchInit', function(instantsearchOptions, algoliaBundle) {
  // Adding a custom Query Rule context
  var newQueryRuleContext = 'new-custom-query-rule-context';
  instantsearchOptions.searchParameters.ruleContexts.push(newQueryRuleContext);

  return instantsearchOptions;
});
Sort facet values with InstantSearch
By default, facet values displayed for a search are sorted by the number of matching results.
The following example shows, how to sort the size facet values based on the size values.
To do this, you need to hook into the event beforeWidgetInitialization to modify the facet for size.
To sort the values in the refinementList based on size, add the sortBy function to the refinementList. This function lets you match values against each other and sort each value.
To determine the order, use the orderedSizes array variable defined in the code below. This can be pulled from any source, like Magento or from another index if needed.
1
2
3
4
5
6
7
8
9
10
11
12
13
14
15
algolia.registerHook('beforeWidgetInitialization', function(allWidgetConfiguration, algoliaBundle) {

  var orderedSizes = ['XXS', 'XS', 'S', 'M', 'L', 'XL', 'XXL'];

  for (var i = 0; i < allWidgetConfiguration.refinementList.length; i++) {
    if (allWidgetConfiguration.refinementList[i].attribute == 'size') {
      allWidgetConfiguration.refinementList[i].sortBy = function(a, b) {
        return orderedSizes.indexOf(a.name) - orderedSizes.indexOf(b.name);
      };
    }
  }

  return allWidgetConfiguration;

});
